Roc Toolkit 0.4 + updated tutorial for live audio streaming
Table of contents
What’s in this release
Roc Toolkit implements real-time streaming over unreliable networks like Internet and Wi-Fi, with high quality and low latency.
It can connect audio apps and devices across network, which run PipeWire, PulseAudio, bare ALSA, macOS CoreAudio, and Android. You can use it via C library, bindings, CLI tools, sound server extensions, and Android app.
Highlights of the new release:
-
Added Roc VAD - a virtual device for macOS using libASPL (when apps play to device, it streams audio to another machine, which can play it)
-
Finished RTCP & XR support and implement two-way report exchange.
-
Added latency tuning on sender instead of receiver (for cases when receiver is more CPU-constrained).
-
Added audio file backends using libsndfile and dr_wav (for cases when external dependencies are limited).
-
Numerous bug-fixes.
-
Portability fixes, including Ubuntu 24.04, macOS 14, OpenWrt/MIPS (all three now added to CI and QA), and Debian GNU/Hurd.
Full changelog is here:
Virtual device for macOS
Roc VAD implements macOS virtual audio device that automatically streams all sound played by apps to remote peers. (Or receives streams from remote peers and allows apps to capture that).
E.g. you can configure it to stream sound from Youtube or iTunes to a Raspberry Pi with speakers over Wi-Fi.
Virtual device driver can be controlled from command-line and via gRPC interface. The latter allows you to use it in your own projects.
For further details, refer to the project README.
F-Droid
Roc Droid (our prototype Android app) is now available on F-Droid.
It doesn’t use 0.4 release yet, but hopefully an update will land soon.
Acknowledgments
I’ve created a list of features which development was sponsored by companies or individuals: see here. I am really grateful to all these people who supported the project!
And of course, huge thanks to all contributors, who made significant additions to this release!
Following updates
As always, welcome to follow updates on the mailing list or my mastodon.
Migration from 0.3
If you’re using CLI tools, you may need to adjust a few options.
We’re currently working on an improved latency tuning engine and memory limits, and these changes are a part of preparations for that.
| old option | new option |
|---|---|
| --sess-latency | --target-latency |
| --clock-backend | --latency-backend |
| --clock-profile | --latency-profile |
| --packet-length | --packet-len |
| --packet-limit | --max-packet-size |
| --frame-length | --frame-len |
| --frame-limit | --max-frame-size |
Similar changes were made in the C API (and bindings), refer to changelog for details.
If you’re using roc-pulse (PulseAudio modules), checkout its README - a lot of new options were added to it recently, and it’s now on a par with the CLI tools.
Linux (PipeWire modules)
Option 1: Install from packages
PipeWire modules for Roc are part of PipeWire upstream, and your some distros already have them. However you need to ensure that the version from your distro uses libroc0.4 or higher.
If you’re lucky, the installation is simple.
On Debian-based distros, you likely already have Roc modules if you have PipeWire installed (pipewire-module-roc-sink and pipewire-module-roc-source).
On Fedora, use:
$ dnf install pipewire-module-roc
On Arch, use:
$ pacman -S pipewire-roc
On nixOS, use:
$ nix-shell -p roc-toolkit
Option 2: Install from sources
Alternatively, you can continue using PipeWire package from your distro, but build latest PipeWire’s Roc modules separately, using PipeWire source tree.
First, install build dependencies according to Roc documentation.
On Debian-based systems, this command will install all needed dependencies:
$ sudo apt-get install build-essential g++ pkg-config scons ragel gengetopt \
    libuv1-dev libunwind-dev libspeexdsp-dev libsox-dev libssl-dev libsndfile-dev libpulse-dev \
    libtool intltool autoconf automake make cmake meson git
Clone Roc sources:
$ git clone https://github.com/roc-streaming/roc-toolkit.git
Build and install Roc:
$ cd roc-toolkit
$ scons -Q --build-3rdparty=openfec
$ sudo scons -Q --build-3rdparty=openfec install
Then install build dependencies according to PipeWire CI.
On Debian-based systems, this command will install all needed dependencies:
$ sudo apt-get install \
    findutils git systemd \
    libasound2-dev libavcodec-dev libavformat-dev libva-dev libglib2.0-dev libgstreamer1.0-dev \
    libdbus-1-dev libdbus-glib-1-dev libudev-dev libx11-dev \
    meson ninja-build pkg-config \
    python3-pip python3-docutils
Clone PipeWire sources:
$ git clone https://gitlab.freedesktop.org/pipewire/pipewire.git
Checkout version which is used on your system:
$ cd pipewire
$ git checkout $(pipewire --version | grep -Eo '[0-9.]+' | head -1)
Build PipeWire and all modules:
$ meson setup builddir
$ meson configure builddir -Dprefix=/usr
$ meson compile -C builddir
Install Roc modules into the system:
$ sudo cp builddir/src/modules/libpipewire-module-roc-sink.so <PIPEWIRE_MODULE_DIR>/
$ sudo cp builddir/src/modules/libpipewire-module-roc-source.so <PIPEWIRE_MODULE_DIR>/
For example, on Debian-based x86_64 systems with PipeWire 0.3.x, PIPEWIRE_MODULE_DIR is /usr/lib/x86_64-linux-gnu/pipewire-0.3.
Configure PipeWire sink (Roc sender)
Perform this step if you want to send sound from your computer to remote Roc receivers, for example, to send sound from a browser or an audio player to a Raspberry Pi board with speakers.
First, ensure that you have pipewire configuration directory:
$ mkdir -p ~/.config/pipewire/pipewire.conf.d
Then, create ~/.config/pipewire/pipewire.conf.d/roc-sink.conf and add the following:
context.modules = [
  {   name = libpipewire-module-roc-sink
      args = {
          fec.code = rs8m
          remote.ip = <IP>
          remote.source.port = 10001
          remote.repair.port = 10002
          sink.name = "Roc Sink"
          sink.props = {
             node.name = "roc-sink"
          }
      }
  }
]
Here, <IP> is the IP address of the Roc receiver.
Then restart PipeWire:
$ systemctl restart --user pipewire.service
Now you should see Roc Source in the list of loaded modules:
$ pw-cli ls Module
	...
	id 29, type PipeWire:Interface:Module/3
 		object.serial = "29"
 		module.name = "libpipewire-module-roc-sink"
After doing this, if you select “ROC Sink” as the output device, sound written to it will be send to remote Roc receiver.
Configure PipeWire source (Roc receiver)
Perform this step if you want to receive sound from remote Roc senders, for example from a Roc sink on another computer, and play it on your computer.
First, ensure that you have pipewire configuration directory:
$ mkdir -p ~/.config/pipewire/pipewire.conf.d
Then, create ~/.config/pipewire/pipewire.conf.d/roc-source.conf and add the following:
context.modules = [
  {   name = libpipewire-module-roc-source
      args = {
          local.ip = 0.0.0.0
          resampler.profile = medium
          fec.code = rs8m
          sess.latency.msec = 100
          local.source.port = 10001
          local.repair.port = 10002
          source.name = "Roc Source"
          source.props = {
             node.name = "roc-source"
          }
      }
  }
]
Then restart PipeWire:
$ systemctl restart --user pipewire.service
Now you should see Roc Source in the list of loaded modules:
$ pw-cli ls Module
	...
	id 28, type PipeWire:Interface:Module/3
 		object.serial = "28"
 		module.name = "libpipewire-module-roc-source"
After doing this, if remote Roc sender will send samples to your computer, it will be played.
Linux (PulseAudio modules)
Install dependencies
On Debian-based systems, this command will install all needed dependencies:
$ sudo apt install -y \
    gcc g++ make libtool intltool m4 autoconf automake \
    meson libsndfile-dev cmake scons git wget python3 \
    pulseaudio
Clone, build, install
These commands will automatically download and build libroc, build PulseAudio modules, and install them into the system.
$ git clone https://github.com/roc-streaming/roc-pulse.git
$ cd roc-pulse
$ make
$ sudo make install
Configure PulseAudio sink (Roc sender)
Perform this step if you want to send sound from your computer to remote Roc receivers, for example, to send sound from a browser or an audio player to a Raspberry Pi board with speakers.
For every remote receiver, e.g. for every Raspberry Pi board running roc-recv, add the following line to /etc/pulse/default.pa:
load-module module-roc-sink remote_ip=<IP> sink_properties=device.description=<NAME>
Here, <IP> is the IP address of the Roc receiver, and <NAME> is a human-readable name that will be displayed in the PulseAudio GUI.
For example:
load-module module-roc-sink remote_ip=192.168.0.100 sink_properties=device.description=Raspberry
This will create a PulseAudio sink that sends all sound written to it to a specific Roc receiver. Local applications like browsers and audio players can then be connected to this sink using usual PulseAudio GUIs like pavucontrol.
Restart PulseAudio:
$ pulseaudio --kill
$ pulseaudio --start
Configure PulseAudio sink-input (Roc receiver)
Perform this step if you want to receive sound from remote Roc senders, for example from a Roc sink on another computer, and play it on your computer.
Add the following line to /etc/pulse/default.pa:
load-module module-roc-sink-input sink_input_properties=media.name=<NAME>
Here, <NAME> is a human-readable name that will be displayed in the PulseAudio GUI.
For example:
load-module module-roc-sink-input sink_input_properties=media.name=Roc
This will create a PulseAudio sink-input that receives the sound from arbitrary Roc senders and writes it to a local sink. This sink-input can then be connected to a sink, typically a sound card, using usual PulseAudio GUIs like pavucontrol.
Restart PulseAudio:
$ pulseaudio --kill
$ pulseaudio --start
Using pavucontrol
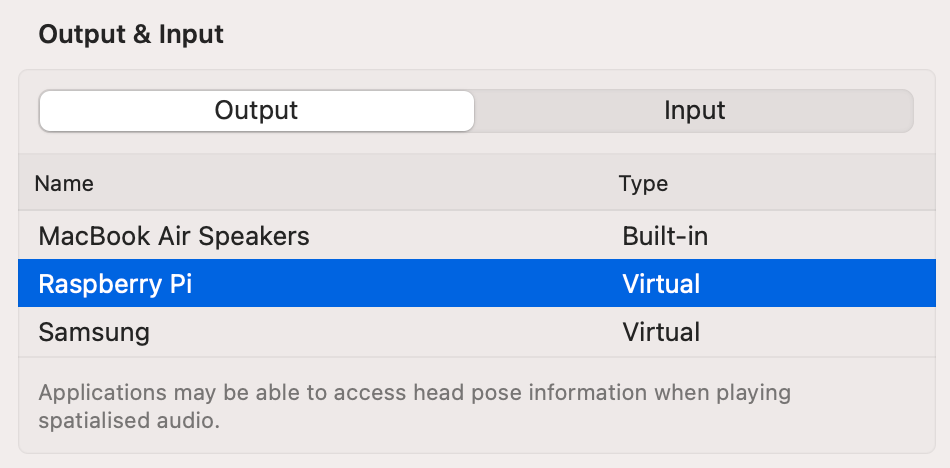
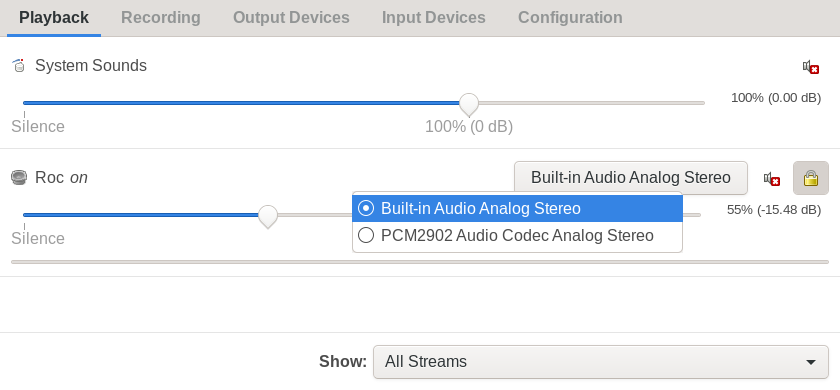
Here is how you can connect VLC player to a Roc sink named “Raspberry” (which sends sound to a Raspberry Pi board) using pavucontrol tool:

And here is how you can connect Roc sink-input named “Roc” (which receives sound from remote Roc sinks) to a specific local sound card:
Linux (bare ALSA)
Full documentation: → how to build, → how to run, → manual pages
Install dependencies
First, install build dependencies. On Debian-based systems, you can use this command:
$ sudo apt-get install build-essential g++ pkg-config scons ragel gengetopt \
    libuv1-dev libunwind-dev libspeexdsp-dev libsox-dev libssl-dev libsndfile-dev libpulse-dev \
    libtool intltool autoconf automake make cmake meson git
Clone, build, install
Clone Roc sources:
$ git clone https://github.com/roc-streaming/roc-toolkit.git
Build and install Roc library and tools:
$ cd roc-toolkit
$ scons -Q --build-3rdparty=openfec
$ sudo scons -Q --build-3rdparty=openfec install
Now you should have roc-send and roc-recv tools in PATH.
Run roc-send (Roc sender)
Perform this step if you want to send sound played on your Raspberry Pi board to a remote Roc receiver, for example to a Roc sink-input on another computer.
Configure a loopback ALSA device in /etc/asound.conf:
pcm.aloop {
   type hw
   card 2
}

ctl.aloop {
   type hw
   card 2
}

defaults.pcm.card 2
defaults.ctl.card 2
Then load the loopback module:
$ sudo modprobe snd-aloop
Run sender:
$ roc-send -vv \
    -s rtp+rs8m://<IP>:10001 -r rs8m://<IP>:10002 -c rtcp://<IP>:10003 \
    -i alsa://plughw:CARD=Loopback,DEV=1
Here, <IP> is the destination IP address running Roc receiver, for example, another computer running Roc receiver.
Note that the exact ALSA device name can be different. You can get the name by running aplay -L and searching for “Loopback” entries.
If you want to automatically start roc-send on boot, and you’re using systemd, create /etc/systemd/system/roc-send.service with the following content:
[Unit]
Description=roc-send
After=network-online.target
Wants=network-online.target systemd-networkd-wait-online.service

[Service]
ExecStart=/usr/bin/roc-send -vv -s rtp+rs8m://<IP>:10001 -r rs8m://<IP>:10002 -c rtcp://<IP>:10003 -i alsa://<DEVICE>
Restart=on-failure
RestartSec=1s

[Install]
WantedBy=multi-user.target
Then run:
$ sudo systemctl daemon-reload
$ sudo systemctl enable --now roc-send.service
You also need to add snd-aloop to /etc/modules:
snd-aloop
Run roc-recv (Roc receiver)
Perform this step if you want to receive sound from remote Roc senders, for example from a Roc sink on another computer, and play it on your Raspberry Pi board.
Run receiver:
$ roc-recv -vv \
    -s rtp+rs8m://0.0.0.0:10001 -r rs8m://0.0.0.0:10002 -c rtcp://0.0.0.0:10003 \
    -o alsa://default
Instead of alsa://default, you can use alsa://<DEVICE>, where DEVICE is one of the names printed by aplay -l, e.g. hw:0.
If you want to automatically start roc-recv on boot, and you’re using systemd, create /etc/systemd/system/roc-recv.service with the following content:
[Unit]
Description=roc-recv
After=network-online.target
Wants=network-online.target systemd-networkd-wait-online.service

[Service]
ExecStart=/usr/bin/roc-recv -vv -s rtp+rs8m://0.0.0.0:10001 -r rs8m://0.0.0.0:10002 -c rtcp://0.0.0.0:10003
Restart=on-failure
RestartSec=1s

[Install]
WantedBy=multi-user.target
Then run:
$ sudo systemctl daemon-reload
$ sudo systemctl enable --now roc-recv.service
Cross-compile to Raspberry Pi (PulseAudio modules)
The following instructions are suitable for Raspberry Pi 2 and later. If you’re using another board, consult the User cookbook and Cross-compiling pages from the documentation.
These instructions assume that you want to use Docker to get a pre-packaged (binary) toolchain for cross-compiling. If you want to prepare the toolchain manually, consult the documentation above.
These instructions also assume that you’re using PulseAudio on your board. If you’re using bare ALSA instead, jump to the next section.
Are you running 32-bit or 64-bit OS on Raspberry?
On your Raspberry board, both CPU and OS may be either 32-bit or 64-bit. What is important is the bitness of OS. If you’re not sure, run:
pi@raspberrypi:~ $ uname -m
on your board. If the output is aarch64, the the OS is 64-bit. If the output is arm* then it’s 32-bit.
Which PulseAudio version are you running on Raspberry?
It’s important to build Roc PulseAudio modules against exactly same version of PulseAudio which is running on your board. If you’re not sure, run:
pi@raspberrypi:~ $ pulseaudio --version
Install dependencies on Raspberry
To install runtime Roc dependencies, ssh to the board and run apt-get:
pi@raspberrypi:~ $ sudo apt-get install libasound2 libpulse0 libltdl7
Install Docker on desktop machine
Follow the official instructions to install Docker from the upstream repo.
If you’re running Ubuntu on your desktop, you can also install Docker packaged by distro:
$ sudo apt-get install docker.io
Cross-compile Roc PulseAudio modules on desktop machine (for 64-bit Raspberry)
$ git clone https://github.com/roc-streaming/roc-pulse.git
$ cd roc-pulse
$ docker run -t --rm -u "${UID}" -v "${PWD}:${PWD}" -w "${PWD}" \
    rocstreaming/toolchain-aarch64-linux-gnu:gcc-7.4 \
        env TOOLCHAIN_PREFIX=aarch64-linux-gnu PULSEAUDIO_VERSION=<???> make
You should replace <???> with the exact version of PulseAudio which you’re using on your Raspberry Pi board, for example 15.99.1.
Cross-compile Roc PulseAudio modules on desktop machine (for 32-bit Raspberry)
$ git clone https://github.com/roc-streaming/roc-pulse.git
$ cd roc-pulse
$ docker run -t --rm -u "${UID}" -v "${PWD}:${PWD}" -w "${PWD}" \
    rocstreaming/toolchain-arm-linux-gnueabihf:gcc-4.9 \
        env TOOLCHAIN_PREFIX=arm-linux-gnueabihf PULSEAUDIO_VERSION=<???> make
You should replace <???> with the exact version of PulseAudio which you’re using on your Raspberry Pi board, for example 15.99.1.
Install Roc PulseAudio modules to Raspberry
Copy command-line tools to the board via ssh:
$ scp ./bin/module-roc-*.so <IP>:/usr/lib/pulse-<PULSE_VER>/modules/
Here, <IP> is the IP address of your Raspberry Pi board, and <PULSE_VER> is the version of PulseAudio which you’re using on your Raspberry Pi board, for example 15.99.1.
Configuring sender or receiver
Now you can ssh to you board and follow instructions from section “Linux (PulseAudio modules)”:
Cross-compile to Raspberry Pi (bare ALSA)
The following instructions are suitable for Raspberry Pi 2 and later. If you’re using another board, consult the User cookbook and Cross-compiling pages from the documentation.
These instructions assume that you want to use Docker to get a pre-packaged (binary) toolchain for cross-compiling. If you want to prepare the toolchain manually, consult the documentation above.
These instructions also assume that you’re using bare ALSA (without PulseAudio) on your board. If you’re using PulseAudio instead, consult the previous section.
Are you running 32-bit or 64-bit OS on Raspberry?
On your Raspberry board, both CPU and OS may be either 32-bit or 64-bit. What is important is the bitness of OS. If you’re not sure, run:
pi@raspberrypi:~ $ uname -m
on your board. If the output is aarch64, the the OS is 64-bit. If the output is arm* then it’s 32-bit.
Install dependencies on Raspberry
To install runtime Roc dependencies, ssh to the board and run apt-get:
pi@raspberrypi:~ $ sudo apt-get install libasound2
Install Docker on desktop machine
Follow the official instructions to install Docker from the upstream repo.
If you’re running Ubuntu on your desktop, you can also install Docker packaged by distro:
$ sudo apt-get install docker.io
Cross-compile Roc tools on desktop machine (for 64-bit Raspberry)
$ git clone https://github.com/roc-streaming/roc-toolkit.git
$ cd roc-toolkit
$ docker run -t --rm -u "${UID}" -v "${PWD}:${PWD}" -w "${PWD}" \
    rocstreaming/toolchain-aarch64-linux-gnu:gcc-7.4 \
      scons -Q \
        --host=aarch64-linux-gnu \
        --build-3rdparty=all \
        --disable-pulseaudio
Cross-compile Roc tools on desktop machine (for 32-bit Raspberry)
$ git clone https://github.com/roc-streaming/roc-toolkit.git
$ cd roc-toolkit
$ docker run -t --rm -u "${UID}" -v "${PWD}:${PWD}" -w "${PWD}" \
    rocstreaming/toolchain-arm-linux-gnueabihf:gcc-4.9 \
      scons -Q \
        --host=arm-linux-gnueabihf \
        --build-3rdparty=all \
        --disable-pulseaudio
Install Roc tools (to 64-bit Raspberry)
Copy command-line tools to the board via ssh:
$ scp ./bin/aarch64-linux-gnu/roc-{recv,send} <IP>:/usr/bin
Here, <IP> is the IP address of your Raspberry Pi board.
Install Roc tools (to 32-bit Raspberry)
Copy command-line tools to the board via ssh:
$ scp ./bin/arm-linux-gnueabihf/roc-{recv,send} <IP>:/usr/bin
Here, <IP> is the IP address of your Raspberry Pi board.
Configuring sender or receiver
Now you can ssh to you board and follow instructions from section “Linux (bare ALSA)”:
macOS (virtual device)
These instructions assume that you want to use roc-vad to create virtual audio devices: virtual speaker or virtual microphone.
Option 1: install from binaries
This will install driver and command-line tool:
$ sudo /bin/bash -c \
  "$(curl -fsSL https://raw.githubusercontent.com/roc-streaming/roc-vad/HEAD/install.sh)"
After running the command, you need to reboot your Mac.
Option 2: install from sources
Prepare environment:
- install Xcode Command Line Tools (instructions) or Xcode (from App Store)
- install Homebrew (instructions)
- install Git (instructions)
Install build dependencies:
$ brew install cmake scons autoconf automake pkg-config libtool go
Clone repo:
$ git clone https://github.com/roc-streaming/roc-vad.git
Build and install:
$ cd roc-vad
$ make
$ sudo make install
Now you need to reboot your Mac.
Check driver
After rebooting, check that driver is loaded and running:
$ roc-vad info
driver is loaded

driver:
  version: 0.0.1
  commit:  76ca125

client:
  version: 0.0.1
  commit:  76ca125
Configure virtual speakers (Roc sender)
If you want to stream from macOS to remote receiver, create virtual speakers:
$ roc-vad device add sender
device #1

  type:   sender
  uid:    aba744-43a201-c27dff-4de630
  name:   Roc Virtual Device #1
  state:  on

  ...
Check that the created device is present:
$ roc-vad device list
index    type       state   uid                            name
1        sender     on      aba744-43a201-c27dff-4de630    Roc Virtual Device #1
After creating sender device, you can connect it to remote receiver. Usually you need to connect three endpoints: source packets (audio traffic), repair packets (for loss recovery), and control packets (for latency tuning).
E.g. if local sender device has index “1” and remote receiver is running at 192.168.0.1 and uses three ports 10001, 10002, and 10003 for source, repair, and control endpoints, then run:
$ roc-vad device connect 1 \
   --source rtp+rs8m://192.168.0.1:10001 \
   --repair rs8m://192.168.0.1:10002 \
   --control rtcp://192.168.0.1:10003
endpoint:
  slot:       0
  interface:  audiosrc
  uri:        rtp+rs8m://192.168.0.1:10001
endpoint:
  slot:       0
  interface:  audiorpr
  uri:        rs8m://192.168.0.1:10002
endpoint:
  slot:       0
  interface:  audioctl
  uri:        rtcp://192.168.0.1:10003
Now, applications play audio to Roc Virtual Device #1, the sound is streamed to the remote receiver. If there are multiple applications, the streams are mixed.
Note that the sound written to sender device is not heard locally. If you need it, you can use third-party software like BlackHole to create a loopback from sender device to local speakers.
Configure virtual microphone (Roc receiver)
If you want to stream to macOS from a remote sender, create virtual microphone:
$ roc-vad device add receiver
device #2

  type:   receiver
  uid:    934855-95c5ca-9841c4-645f85
  name:   Roc Virtual Device #2
  state:  on

  ...
Check that device is present:
$ roc-vad device list
index    type       state   uid                            name
1        sender     on      aba744-43a201-c27dff-4de630    Roc Virtual Device #1
2        receiver   on      934855-95c5ca-9841c4-645f85    Roc Virtual Device #2
After creating receiver device, you can bind it to local endpoints. Usually you need to bind three endpoints: source packets (audio traffic), repair packets (for loss recovery), and control packets (for latency tuning).
E.g. if receiver device has index “2” and you want to use three ports 10001, 10002, and 10003 for source, repair, and control endpoints, then run:
$ roc-vad device bind 2 \
   --source rtp+rs8m://0.0.0.0:10001 \
   --repair rs8m://0.0.0.0:10002 \
   --control rtcp://0.0.0.0:10003
endpoint:
  slot:       0
  interface:  audiosrc
  uri:        rtp+rs8m://0.0.0.0:10001
endpoint:
  slot:       0
  interface:  audiorpr
  uri:        rs8m://0.0.0.0:10002
endpoint:
  slot:       0
  interface:  audioctl
  uri:        rtcp://0.0.0.0:10003
Now, applications that records audio from Roc Virtual Device #2 gets the sound streamed to receiver from remote senders. If there are multiple senders, the streams are mixed.
Note that the sound sent to receiver device is not heard locally. Receiver device acts as a virtual microphone for other applications, not as a player for received sound. If you need it, you can use third-party software like BlackHole to create a loopback from receiver device to local speakers. Or don’t use virtual device at all and just use
roc-recvCLI tool as described below.
Persistence
All created devices and all their settings (including bound and connected endpoints) are stored persistently. If you restart audio server or reboot, roc-vad will recreate them.
If you want to disable device temporarily without losing its configuration, you can use disable and enable commands:
$ roc-vad device disable 1
disabled device with index 1
$ roc-vad device enable 1
enabled device with index 1
If you want to remove device permanently, use del command:
$ roc-vad device del 1
deleted device with index 1
Uninstallation
To uninstall driver and tool from your machine, run:
$ sudo roc-vad uninstall
If you’ve installed from source, you can alternatively run:
sudo make uninstall
After that, you need to reboot your Mac.
macOS (CLI tools)
Full documentation: → how to build, → how to run, → manual pages
These instructions assume that you want to use roc-recv or roc-send CLI tools directly, without creating virtual audio devices.
Prepare environment
- install Xcode Command Line Tools (instructions) or Xcode (from App Store)
- install Homebrew (instructions)
- install Git (instructions)
Install dependencies
$ brew install libtool autoconf automake make cmake \
    pkg-config scons ragel gengetopt libuv speexdsp sox libsndfile openssl@3
Clone, build, install
$ git clone https://github.com/roc-streaming/roc-toolkit.git
$ cd roc-toolkit
$ scons -Q --build-3rdparty=openfec PKG_CONFIG=`brew --prefix`/bin/pkg-config
$ sudo scons -Q --build-3rdparty=openfec PKG_CONFIG=`brew --prefix`/bin/pkg-config install
Run roc-send (Roc sender)
If you want to send sound played on your macOS from a microphone to a remote Roc receiver, for example to a Raspberry Pi box, run roc-send:
$ roc-send -vv -s rtp+rs8m://<IP>:10001 -r rs8m://<IP>:10002 -c rtcp://<IP>:10003 -i "core://default"
Here, <IP> is the destination IP address running Roc receiver.
Instead of core://default, you can use core://<DEVICE>, where DEVICE is one of the names printed by system_profiler SPAudioDataType.
Run roc-recv (Roc receiver)
If you want to receive sound from remote Roc senders, for example from a Roc sink on another computer and play it on your macOS computer, run roc-recv:
$ roc-recv -vv -s rtp+rs8m://0.0.0.0:10001 -r rs8m://0.0.0.0:10002 -c rtcp://0.0.0.0:10003
Android app
To run Roc receiver and sender on Android device, you can use our prototype app Roc Droid.
You can install it from F-Droid, IzzyOnDroid, or download prebuilt APK for latest release. You can also build it from source by following instructions in README.
The app can work in two modes:
- receive sound from remote Roc sender, and play it on Android
- grab sound, either from currently playing Android apps, or from microphone, and send it to remote Roc receiver

Troubleshooting
Check sound
Before running Roc tools on Raspberry that uses bare ALSA, ensure that sound is working on your board using aplay or arecord. Other useful commands are alsamixer and alsactl init, but their usage it out of the scope of this tutorial.
If Raspberry uses PulseAudio or PipeWire, ensure that the daemon is running, pactl shows expected devices, and you can play or capture audio using paplay and parec (or pw-play and pw-record).
Also make sure that Roc CLI tool or module is connected to the right source or sink. E.g. for PulseAudio you may need to use pactl move-sink-input.
Check network
When you run Roc sender and Roc receiver, you should see information about connected sender in receiver’s logs and vice versa. If you don’t, it indicates problems with network connection, e.g. you used incorrect address or port.
Obtain logs
Command-line tools write logs to standard output, if you specify -vv option. If you’re using systemd to run them, logs can be seen using journalctl.
To see logs from PulseAudio modules, you can disable pulseaudio via systemd and run daemon manually in terminal using pulseaudio -vvv command. Alternatively, you can enable verbose logs in pulseaudio config and use journalctl.
Sound server
Remember that PulseAudio and PipeWire typically run as user, so you need --user flag for systemctl and journalctl.
Also be aware that systemd may unload all user services when you’re not logged in (e.g. you’re running headless Raspberry and have no active ssh sessions). You may need to enable lingering to prevent this.
Virtual devices
If virtual devices are not shown on mac, you can try disabling (roc-vad device disable) and re-enabling (roc-vad device enable) device, or rebooting computer.
Broken playback
If you hear frequent stuttering, try increasing target_latency, io_latency, and latency_tolerance parameters (names may slightly vary for CLI tools and sound server modules)
If you hear awful loud noises, make sure that packet_encoding and fec_encoding match on sender and receiver.